You want to make coffee while camping? You can do it with just a few simple tools and a little know-how. There’s nothing like sipping hot coffee while camping, surrounded by fresh air and morning light. Many coffee lovers say the best cup comes from a quiet spot in the wild. You don’t need much to make coffee while camping—just pick your favorite method and bring the right gear. A good coffee grinder for camping helps you get that fresh taste, even far from home.
Key Takeaways
Pick a brewing method that matches your camping style. You can use instant coffee for speed. You can use a French press or AeroPress for better taste.
Bring the right tools like a small coffee grinder. Bring a stove that heats water well. This helps you enjoy fresh coffee anywhere.
Use clean, filtered water for your coffee. Use the right amount of coffee and water. This stops your coffee from tasting weak or bitter.
Keep your coffee tools clean with natural cleaners. Take used grounds with you to protect nature. This also keeps your gear in good shape.
Change your brewing method and grind size for your group. Change them for your own taste too. This helps make every cup great in the wild.
Brewing Methods

Instant Coffee
Instant coffee is the easiest way to make coffee while camping. You just need hot water and a packet of instant coffee. Many campers love this method because it is lightweight and quick. You do not need any extra gear. Here’s how you do it:
Boil water over your camp stove or fire.
Pour the hot water into your mug.
Add a packet of instant coffee.
Stir well and enjoy.
Tip: Specialty instant coffees like Mount Hagen and Alpine Start taste much better than old-school brands. Some even have smooth, well-balanced flavors that surprise coffee lovers. If you want a richer taste, try brands like Voila or Four Sigmatic Mushroom Coffee Mix.
Brand | Flavor Profile | Roast Type | Rating (out of 5) | Price Info |
|---|---|---|---|---|
Black Rifle Coffee | Smooth, not bitter, medium-dark roast | Medium-dark roast | 3.5 | $24.99 (32 packets) |
Alpine Start | Smooth, slightly stronger, not bitter | Medium roast | 4 | $8.99 (8 packets) |
Tioga Rise | Smooth, unique flavor, not bitter | Medium roast | 3.5 | $1.50 each |
Instant coffee is perfect for backpackers who want to travel light. You can even mix some brands with cold water if you do not have a way to heat water. The only downside is that instant coffee usually has less caffeine, so you might want a second cup.
Coffee Bags
Coffee bags work like tea bags but with ground coffee inside. They are super easy to use and great for campers who want a little more flavor than instant coffee. Here’s how you make coffee with a coffee bag:
Boil water.
Place a coffee bag in your mug.
Pour hot water over the bag.
Let it steep for 3-5 minutes, depending on how strong you want it.
Remove the bag and enjoy.
Note: Coffee bags are convenient and make cleanup easy. Most are biodegradable, so they are better for the environment than plastic pods. Some brands, like Kuju and Wildland Coffee, offer single-serve pour-over bags that are easy to pack.
Coffee bags give you a smooth, mild cup. You cannot change the strength much, but they are a good middle ground between instant and more involved brewing methods. If you care about the planet, look for eco-friendly options made from compostable materials.
Pour-Over
Pour-over camping coffee gives you a fresh, clean taste. Many campers say this is the best way to get a perfect cup of camping coffee. You need a dripper, a filter, ground coffee, and hot water. Here’s how to do it:
Place your pour-over dripper on top of your mug.
Put a filter in the dripper and add ground coffee (about 2 tablespoons per cup).
Boil water and let it cool for 30 seconds.
Pour a little water over the grounds to let them “bloom” for 30 seconds.
Slowly pour the rest of the water in circles over the grounds.
Wait for the coffee to drip through, then remove the dripper and enjoy.
Tip: Lightweight, collapsible drippers like the Zebrang V60 Flat, JavaFlex, or GSI Ultralight Java Drip are great for camping. The MiiR Pourigami is super durable and packs flat. You can skip paper filters with some mesh drippers.
Pour-over is a favorite among campers who want quality and do not mind carrying a little extra gear. It is also one of the best camp coffee makers for those who love a clean, bright cup.
AeroPress
AeroPress coffee is a top pick for many campers. The AeroPress makes rich, smooth coffee with no bitterness. It is easy to use, quick to clean, and very portable. Here’s how you make aeropress coffee outdoors:
Place a filter in the AeroPress cap and attach it to the chamber.
Add ground coffee (about 1-2 scoops).
Pour hot water up to the desired mark.
Stir for 10 seconds.
Insert the plunger and press down slowly.
Enjoy your fresh cup!
The AeroPress Go is perfect for camping. It packs all its parts into a travel mug. Bring a manual grinder for fresh grounds. Many campers use the AeroPress with a mesh filter to cut down on waste.
AeroPress coffee stands out for its smooth taste and low acidity. You can make espresso-style shots or even cold brew. It is great for solo campers or small groups who want quality coffee while camping.
French Press
The French press is a classic way to make coffee while camping. Many campers love it for its rich flavor and simple process. You just need a press, ground coffee, and hot water. Here’s how you do it:
Add coarse ground coffee to the French press (about 2 tablespoons per cup).
Pour in hot water.
Stir and put the lid on with the plunger up.
Let it steep for 4 minutes.
Slowly press the plunger down.
Pour and enjoy.
For camping, use an insulated french press made from stainless steel. These keep your coffee hot and are tough enough for outdoor use. The GSI Outdoors JavaPress and Stanley Adventure French Press are popular choices.
French Press Model | Pros | Cons |
|---|---|---|
GSI Outdoors JavaPress | Durable, easy to use, keeps coffee hot, compact | Small capacity (4 cups) |
Stanley Adventure All-in-One | Versatile, compact, keeps coffee hot | Slow brewing, can be heavy |
Glass French Press | Attractive, large capacity | Fragile, not good for camping |
An insulated french press is best for car campers or groups. It keeps your coffee warm for hours and stands up to rough use. If you want a strong, bold cup, this is a great choice.
Cowboy Coffee
Cowboy coffee is the old-school way to make coffee while camping. You do not need any special gear—just a pot, water, and coffee grounds. Here’s how you do it:
Boil water in a pot over your campfire or stove.
Remove the pot from heat and add coarse coffee grounds (about 2 tablespoons per cup).
Stir and let it steep for 2-4 minutes.
Stir again, then let the grounds settle for a few minutes.
Pour the coffee slowly into your mug, leaving the grounds behind.
Tip: Use a paper filter or clean bandana to strain the coffee if you want less grit. Some campers add a pinch of salt or crushed eggshells to help the grounds settle.
Cowboy coffee gives you a strong, bold flavor. It takes practice to get it just right. Avoid over-boiling the grounds to keep your coffee from tasting bitter.
Cold Brew
Cold brew is a great option if you want to skip the stove. You can make it ahead of time or let it steep overnight at your campsite. Here’s how to make cold brew coffee while camping:
Mix 1 part coffee grounds with 4 parts cold water in a jar or container.
Stir and cover.
Let it steep for 12-24 hours at room temperature or in a cooler.
Strain the coffee through a fine sieve or filter.
Store in a sealed container and keep it cold.
Cold brew stays fresh for up to two weeks in a cooler. Use airtight containers to keep out moisture and odors. This method is perfect for hot days or when you want coffee ready to go.
Cold brew is smooth and less acidic than hot coffee. You do not need any heat, so it is super convenient for camping trips.
Percolator
The percolator is a traditional favorite for making coffee while camping, especially for groups. It brews strong coffee and works well over a camp stove. Here’s how you use it:
Fill the percolator with water up to the marked line.
Add coarse ground coffee to the basket (about 1 tablespoon per cup).
Assemble the percolator and place it over medium heat.
Wait for the water to bubble up into the glass knob.
Brew for 7-10 minutes, adjusting time for your taste.
Remove from heat and let it settle before pouring.
Advantages | Disadvantages |
|---|---|
Brews large amounts at once | Bulky and heavy for backpacking |
Durable and reliable | Can be hard to clean |
Traditional camp coffee experience | Coffee may get bitter if over-brewed |
Affordable for group camping | Glass knob can be fragile |
Listen for the bubbling sound to know when your coffee is ready. Let the percolator sit for a few minutes after brewing so the grounds settle.
Percolators are best for car campers or RV travelers who want to make coffee for a crowd. If you want a classic camp coffee experience, this is a solid choice.
Moka Pot
The moka pot makes strong, espresso-like coffee. It is a favorite for campers who want a bold cup. Stainless steel moka pots work best outdoors because they are tough and easy to clean. Here’s how you use one:
Fill the bottom chamber with water up to the valve.
Add finely ground coffee to the filter basket.
Assemble the moka pot and place it on a portable gas stove or alcohol stove.
Heat until you hear a hissing sound and coffee fills the top chamber.
Remove from heat and pour.
Use a portable gas stove for even heating. Avoid open flames, which can damage the handle. Stainless steel models like the MiiR or Grosche Milano are great for camping.
Moka pots brew quickly (about five minutes) and give you a rich, strong cup. They are best for one or two people who want a coffeehouse-style drink in the wild.
Gear & Tips
Water Heating
Heating water is the first step for great coffee while camping. You have lots of options in your camping kitchen. Some stoves boil water fast, while others save fuel. Check out this table to compare popular choices:
Stove Type | Fuel Type | Boiling Time (1L) | Fuel Efficiency | Notes |
|---|---|---|---|---|
Liquid Fuel Stove | White gas | 3.5 – 5 min | High | Works well in cold weather; heavier for packing. |
Propane Stove | Propane | About 5 min | Moderate to High | Good for car camping; easy to use. |
Canister Fuel Stove | Iso/butane blend | About 5 min | Moderate | Lightweight; best for summer trips. |
Alcohol Stove | Denatured alcohol | 5 – 10 min | Very High | Simple and light; slower boil. |
Ghillie Kettle | Biofuel (twigs) | 5 – 7 min | High | Uses sticks or twigs; great for backcountry. |
Integrated Canister System | Iso/butane blend | 3 – 5 min | Very High | Fast and efficient; packs small. |
Solid Fuel Stove | Solid fuel tablets | 8 – 15 min | Low | Slow; not ideal for quick coffee. |
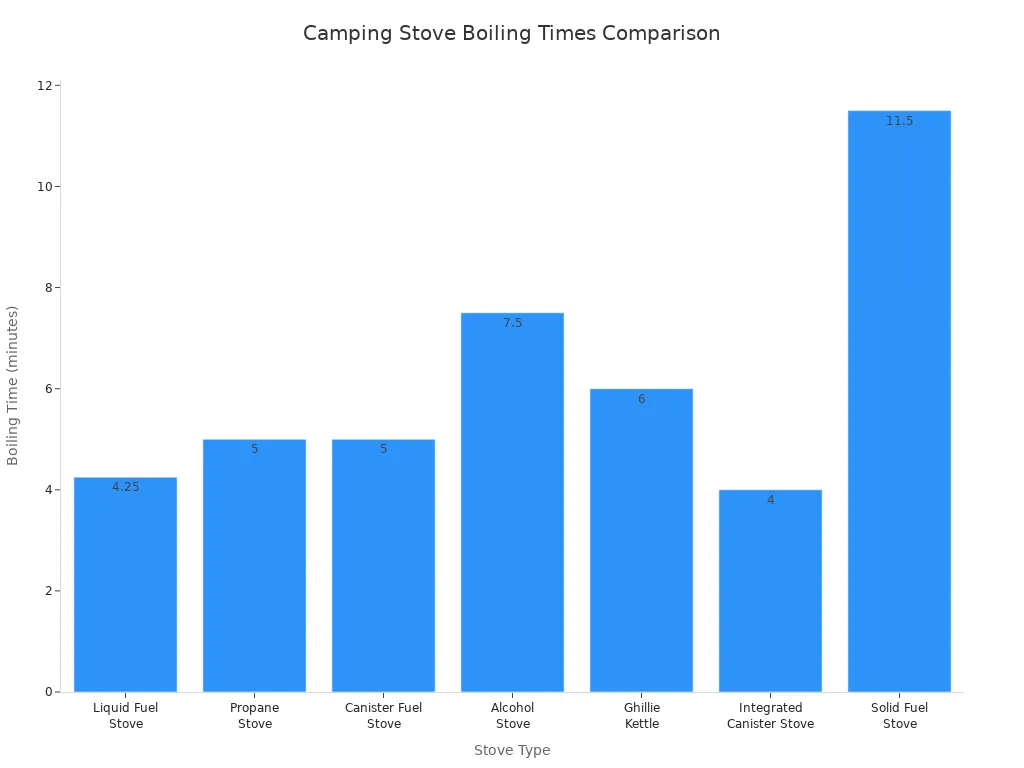
Choose a stove that fits your camping kitchen and group size. If you want to save fuel, try an alcohol stove or a Ghillie Kettle.
Cleanup
Keeping your camping kitchen clean helps protect nature and makes your trip easier. You can use natural cleaners like vinegar, baking soda, or lemon juice to wash your coffee gear. These work well and do not harm the environment. Regular cleaning keeps your equipment working longer. Avoid chemical cleaners, especially near streams or lakes. Always pack out used coffee grounds and filters. If you use a French press or pour-over, dump grounds into a trash bag, not on the ground.
Tip: Wipe mugs and pots with a small towel to save water. Rinse with a little hot water if needed.
Group Size
Your group size changes how you make coffee while camping. If you camp alone, pick lightweight gear like an AeroPress or pour-over cone. For two or more people, use a French press, percolator, or moka pot. These brew more coffee at once and save time.
Group Size | Recommended Brewing Methods |
|---|---|
Solo campers | AeroPress, pour-over, instant coffee |
Groups (2+) | French press, percolator, moka pot |
Cowboy coffee works for big groups, but you might get grounds in your cup. Moka pots make strong coffee for sharing with a few friends.
Extras & Add-Ins
You can make your coffee while camping taste even better with extras. Many campers add flavored scoops like vanilla, hazelnut, or chocolate raspberry. Sprinkle cinnamon on your grounds for a cozy smell. Milk and sugar are classic add-ins. Powdered milk or non-dairy creamers work well since they do not need a fridge. Some campers mix regular and decaf coffee. Honey is a sweet choice for both coffee and tea.
Try packing your favorite add-ins in small containers. This keeps your camping kitchen organized and makes mornings more fun.
Coffee Grinder for Camping

Chefshere Rechargeable Grinder
You want the best taste when you brew coffee outdoors. A coffee grinder for camping makes a big difference. Chefshere’s rechargeable coffee grinder gives you fresh grounds wherever you set up camp. You do not need a power outlet. The battery lasts for many uses, so you can enjoy coffee on long trips. The grinder feels light and packs easily. The ceramic burrs work quietly, so you do not disturb the peace of nature. You get a stable base with a locking design, which means you do not have to hold it while grinding. The BPA-free plastic keeps your coffee safe and healthy.
Tip: Charge your Chefshere grinder before your trip. You can use it for coffee, spices, or nuts. Some models even connect to your phone for smart settings.
Grind Settings
You can change the grind size with Chefshere’s grinder. This helps you match your brewing method. If you use a French press, pick a coarse grind. For pour-over or AeroPress, try a medium grind. Espresso needs a fine grind. The adjustable settings make it easy to switch. You get the best flavor from freshly roasted coffee beans when you grind them right before brewing. Chefshere’s grinder gives you control, so you can make coffee just how you like it.
Brewing Method | Grind Size | Chefshere Setting |
|---|---|---|
French Press | Coarse | 5-6 |
Pour-Over | Medium | 3-4 |
AeroPress | Medium-Fine | 2-3 |
Espresso | Fine | 1 |
Portability
You want gear that travels well. Chefshere’s coffee grinder for camping fits in your backpack or camp kitchen. The compact size saves space. The grinder is tough and stands up to outdoor use. You do not need to worry about noise, since the ceramic burrs run quietly. Portable coffee grinders like Chefshere help you grind your camping coffee anywhere. You get fresh flavor every morning, even far from home.
Note: Clean your grinder after each trip. This keeps it working smoothly and ready for your next adventure.
Troubleshooting
Weak Coffee
You wake up in the wild, but your coffee tastes weak. Don’t worry—this happens to many campers. The most common reason is water that’s not hot enough. Always heat your water to about 195–205°F. If you don’t have a thermometer, bring the water to a boil, then let it cool for 30 seconds before brewing. Use the right amount of coffee. A good rule is two tablespoons of ground coffee for every six ounces of water. Freshly ground beans give you more flavor, so grind them just before brewing. Try to keep your coffee-to-water ratio close to 1:16. If you’re at a high elevation, water boils at a lower temperature, so steep your coffee a little longer for a stronger taste.
Tip: Pour-over and AeroPress methods make it easy to control strength. If your coffee still tastes weak, add a little more coffee next time.
Grounds in Cup
No one likes a mouthful of coffee grounds. This problem pops up with cowboy coffee, French press, or percolators. To avoid this, use a coarser grind for French press and percolators. Press the plunger slowly on a French press. For cowboy coffee, let the grounds settle after brewing, then pour gently. Some campers add a pinch of salt or crushed eggshells to help the grounds sink. If you use pour-over or coffee bags, you’ll get a cleaner cup.
Brewing Method | How to Reduce Grounds in Cup |
|---|---|
French Press | Use coarse grind, press slowly |
Cowboy Coffee | Let grounds settle, pour gently |
Percolator | Avoid fine grounds, use basket filter |
Pour-Over | Use paper or mesh filter |
Water Quality Tips
Water makes up about 98% of your coffee, so it matters a lot. If your water tastes bad, your coffee will too. Hard water can make your coffee taste strange and leave mineral buildup in your gear. Soft water might not bring out all the flavors. The best choice is filtered or bottled water. This gives you a clean, fresh taste every time. If you use water from a stream or lake, always filter or boil it first. Clean water helps you get that perfect cup of camping coffee, no matter where you are.
Note: Store water in clean containers and descale your coffee gear often to keep flavors pure.
You can make amazing coffee in the wild with just a little planning. Pick the brewing style that fits your adventure. Try new gear like the Chefshere rechargeable grinder for fresh grounds every time. Great coffee makes mornings outdoors even better.
Enjoy each cup, breathe in the fresh air, and make memories that last. ☕🌲
FAQ
How do you keep coffee hot while camping?
You can use an insulated mug or thermos. Stainless steel French presses work great, too. Wrap your mug in a towel for extra warmth. Hot coffee stays fresh longer when you keep it covered.
What’s the easiest way to clean coffee gear at camp?
Wipe your gear with a towel first. Rinse with a little hot water. Use natural cleaners like baking soda or lemon juice. Always pack out used grounds and filters to keep your campsite clean.
Can you grind coffee beans without electricity?
Yes! Chefshere’s rechargeable grinder runs on battery power. Manual grinders also work well. You get fresh grounds anywhere, even far from outlets. Charge your grinder before your trip for best results.
What water should you use for camp coffee?
Filtered or bottled water gives you the best taste. If you use water from a stream, boil or filter it first. Clean water helps your coffee taste fresh and keeps your gear in good shape.